Difference between revisions of "Abyss"
| (12 intermediate revisions by 6 users not shown) | |||
| Line 1: | Line 1: | ||
| − | [[File:Abyss Big Map.jpg|right|thumb|x400px|]]Welcome to the most time consuming tier in EZServer.<br><br>Although T5 (i.e. "Illsalin" or "The Abyss") will take an enormous amount of time to complete, it can also be very fun.<br><br> | + | [[File:Abyss Big Map.jpg|right|thumb|x400px|]]Welcome to the most time consuming tier in EZServer with the exception of T10.<br><br>Although T5 (i.e. "Illsalin" or "The Abyss") will take an enormous amount of time to complete, it can also be very fun.<br><br> |
To progress through this zone, ''BEGIN BY HAILING THE "GREETINGS" NPC ON EVERY CHARACTER''. This will give you the quest in which you must kill 100 different "[[bosses]]", which are each spawned in a different way depending on the [[boss]]. Kill all the corals to spawn the [[boss]] of the zone, "[[White]]" who drops your 4.5 [[epic]]. Once you finish the 100 kill quest, you will receive your 5.0 [[epic]]. After you have created your 5.0 [[epic]] and all of your visible armor pieces, you can hail the [[Level Up Wench]] to be flagged for [[Anguish]]. | To progress through this zone, ''BEGIN BY HAILING THE "GREETINGS" NPC ON EVERY CHARACTER''. This will give you the quest in which you must kill 100 different "[[bosses]]", which are each spawned in a different way depending on the [[boss]]. Kill all the corals to spawn the [[boss]] of the zone, "[[White]]" who drops your 4.5 [[epic]]. Once you finish the 100 kill quest, you will receive your 5.0 [[epic]]. After you have created your 5.0 [[epic]] and all of your visible armor pieces, you can hail the [[Level Up Wench]] to be flagged for [[Anguish]]. | ||
<br><br> | <br><br> | ||
| Line 32: | Line 32: | ||
P 34.0000, 334.0000, 0.0000, 73, 0, 240, 2, Kill_Jellyfish_-_Oneup_or_Angler_Trigger<br> | P 34.0000, 334.0000, 0.0000, 73, 0, 240, 2, Kill_Jellyfish_-_Oneup_or_Angler_Trigger<br> | ||
| + | '''NOTE:''' Triggered bosses DO NOT spawn where you kill the trigger mob, they will spawn elsewhere in the zone. See TIPS section below for important information on making the location of the spawned bosses much easier to find. | ||
== 100 [[Boss]] List == | == 100 [[Boss]] List == | ||
| − | [[File:Abyss Big Map Coral.jpg|right| | + | [[File:Abyss Big Map Coral.jpg|right|thumb|x500px|]]Below is a table of the 100 [[bosses]], which armor pieces are dropped, and how to spawn them.<br> |
The [[bosses]] are spawned according to 4 different methods:<br> | The [[bosses]] are spawned according to 4 different methods:<br> | ||
'''KILL ALL''': | '''KILL ALL''': | ||
| Line 41: | Line 42: | ||
'''TIMED''': | '''TIMED''': | ||
* Every 30 minutes, a random [[boss]] from the "timed" category of [[bosses]] will spawn in the zone. You do not have to kill anything for this to happen<br> | * Every 30 minutes, a random [[boss]] from the "timed" category of [[bosses]] will spawn in the zone. You do not have to kill anything for this to happen<br> | ||
| + | ''Parking 1 toon in an instance to watch for Timed spawns will likely result in going linkdead after 15-20 minutes. Not all people experience this, although the vast | ||
| + | majority do. Park 2 toons per instance at least when camping Timed spawns.'' <br> | ||
'''TRIGGER''': | '''TRIGGER''': | ||
* ''Make sure you have added the trigger text to your map file, as shown in the section above'' | * ''Make sure you have added the trigger text to your map file, as shown in the section above'' | ||
* Killing the one specific trigger mob of the type of NPC has a chance to start a CHAIN that will always spawn one of two [[bosses]]. | * Killing the one specific trigger mob of the type of NPC has a chance to start a CHAIN that will always spawn one of two [[bosses]]. | ||
* The chain will spawn 2 successive "trash" NPCs, and after killing them will ''always'' spawn one of two specified [[bosses]]. | * The chain will spawn 2 successive "trash" NPCs, and after killing them will ''always'' spawn one of two specified [[bosses]]. | ||
| − | * Use "/highlight npc" to see where the chain NPC spawns | + | * '''Use "/highlight npc" to see where the chain NPC spawns''' if you do not use the /highlight npc command ''before'' you begin killing the trigger mobs, there is no way you will know if/where one of the successive trash spawns has popped. Using /highlight npc will change all of the current NPC's to a different color, any new NPC that spawns, will show up in the original NPC color for your map. |
{| class="wikitable sortable" | {| class="wikitable sortable" | ||
| Line 256: | Line 259: | ||
| 100||[[Riptor]]||[[Warrior]]||Hand||Random||[[Illthocyte]] | | 100||[[Riptor]]||[[Warrior]]||Hand||Random||[[Illthocyte]] | ||
|} | |} | ||
| − | <small>Source information by Pimpn: http:// | + | <small>Source information by Pimpn: http://ezserver.online/forums/index.php?topic=2013.0<br></small> |
== Tips == | == Tips == | ||
* It might help to keep track of which [[bosses]] and loots you have, and which you need. Here is a download link for a printable 100 [[Boss]] Checklist: | * It might help to keep track of which [[bosses]] and loots you have, and which you need. Here is a download link for a printable 100 [[Boss]] Checklist: | ||
| − | ** [http:// | + | ** [http://wiki.ezserver.online/images/3/34/T5Checklist.xlsx T5 Excel Checklist] |
* This is the first tier that it is ''almost'' essential that you have access to a [[Free Waypoint (Reward Item)]]. The ability to repop this zone will make the last 10 or so [[bosses]] MUCH, MUCH easier and faster. | * This is the first tier that it is ''almost'' essential that you have access to a [[Free Waypoint (Reward Item)]]. The ability to repop this zone will make the last 10 or so [[bosses]] MUCH, MUCH easier and faster. | ||
* Use "'''/stick uw'''" instead of just "/stick" to make underwater following (slightly) better. | * Use "'''/stick uw'''" instead of just "/stick" to make underwater following (slightly) better. | ||
| Line 266: | Line 269: | ||
* If you are only after a specific [[boss]], you may want to use "'''/mapshow nameofnpc'''" or "'''/maphide nameofnpc'''" to see only what you need to kill | * If you are only after a specific [[boss]], you may want to use "'''/mapshow nameofnpc'''" or "'''/maphide nameofnpc'''" to see only what you need to kill | ||
* If the last NPC of a "Kill All" [[boss]] is a trigger NPC, it will ''not'' spawn the "Kill All" [[boss]]. | * If the last NPC of a "Kill All" [[boss]] is a trigger NPC, it will ''not'' spawn the "Kill All" [[boss]]. | ||
| + | * The accessories that drop here can be upgraded in [[Anguish]] so they are worth getting on each character as well as the visible armour | ||
| + | |||
| + | == Respawn Time == | ||
| + | * 4 hrs | ||
| + | |||
== Loot == | == Loot == | ||
| + | * [[Abyss Vellum]] | ||
* [[Essence#Abyss|Essence of The Abyss]] | * [[Essence#Abyss|Essence of The Abyss]] | ||
| + | * [[Gemstone of the Ages]] (ultra-rare drop from any mob) | ||
| + | * [[Mounts|Kizziebelle's Mythical Unicorn]] | ||
| + | * [[Rainbow Crystals]] (ultra-rare drop from any mob) | ||
| + | * [[Stone of Heroic Resistance V]] | ||
* [[Epic Weapon Skins#Abyss|T5 Epic Weapon Skins]] | * [[Epic Weapon Skins#Abyss|T5 Epic Weapon Skins]] | ||
| − | * [[War Bear Saddle]] | + | * [[Mounts|War Bear Saddle]] |
| − | + | ||
| − | + | ||
| − | + | ||
| − | + | ||
| − | + | ||
== Spell Drops == | == Spell Drops == | ||
| Line 379: | Line 388: | ||
| [[Spell: Theft of Toughness]] II||[[Shadow Knight]] | | [[Spell: Theft of Toughness]] II||[[Shadow Knight]] | ||
|} | |} | ||
| − | + | __NOTOC__ | |
[[Category:Progression]] | [[Category:Progression]] | ||
[[Category:Spells]] | [[Category:Spells]] | ||
Latest revision as of 09:27, 12 December 2024
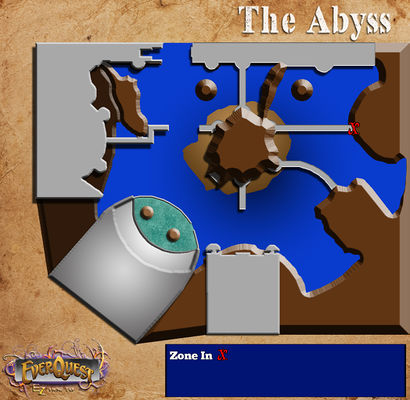
Welcome to the most time consuming tier in EZServer with the exception of T10.Although T5 (i.e. "Illsalin" or "The Abyss") will take an enormous amount of time to complete, it can also be very fun.
To progress through this zone, BEGIN BY HAILING THE "GREETINGS" NPC ON EVERY CHARACTER. This will give you the quest in which you must kill 100 different "bosses", which are each spawned in a different way depending on the boss. Kill all the corals to spawn the boss of the zone, "White" who drops your 4.5 epic. Once you finish the 100 kill quest, you will receive your 5.0 epic. After you have created your 5.0 epic and all of your visible armor pieces, you can hail the Level Up Wench to be flagged for Anguish.
Progression
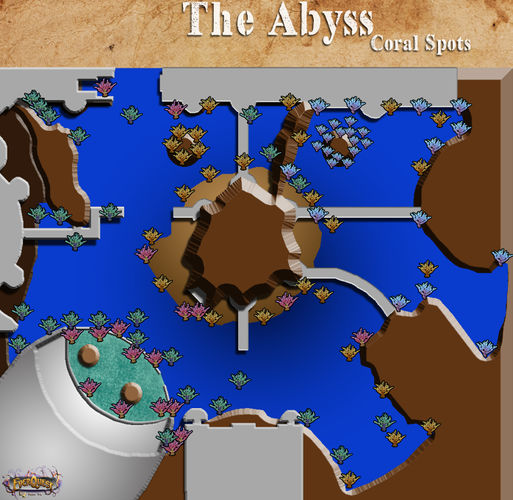
- Kill all Corals (green, yellow, red, blue) to spawn White
- Kill White to loot "Completed Epic 4.5"
- Complete 100 kill quest and hail quest NPC in Illsalin to receive "Completed Epic 5.0"
- Collect all visible armor pieces
- Hail Level Up Wench to be flagged for Anguish
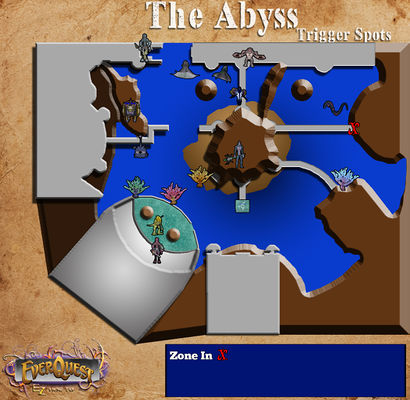
Trigger Map Code
Do the following to add trigger locations to your map. Trust me, you want to do this.- Go to your map folder under your EverQuest directory.
- Open "Illsalin_3.txt"
- Replace what is in the file (if there is anything) with the below text EXACTLY.
P 462.0000, 995.0000, 0.0000, 73, 0, 240, 2, Kill_Alkari_-_Phytosaur_or_Guyver_Trigger
P 603.0000, 214.0000, 0.0000, 73, 0, 240, 2, Kill_Exobeast_-_Ice_Bone_or_Six_Eyes_Trigger
P 144.0000, 1163.0000, 0.0000, 73, 0, 240, 2, Kill_Yellow_Coral_-_Clyde_or_God_of_the_Deep_Trigger
P 1107.0000, 1084.0000, 0.0000, 73, 0, 240, 2, Kill_Blue_Coral_-_Pink_Eyes_or_Burn_Trigger
P -131.0000, 1266.0000, 0.0000, 73, 0, 240, 2, Kill_Red_Coral_-_Black_Paw_or_Bloodlust_Trigger
P -306.0000, 1265.0000, 0.0000, 73, 0, 240, 2, Kill_Green_Coral_-_Dracolisk_or_Twenty_Four_Carat_Trigger
P 43.0000, 1611.0000, 0.0000, 73, 0, 240, 2, Kill_Slarg_-_Hidden_or_Driller_Trigger
P -99.0000, 1761.0000, 0.0000, 73, 0, 240, 2, Kill_Illthocyte_-_Slayer_or_Holocaust_Disciple_Trigger
P -194.0000, 195.0000, 0.0000, 73, 0, 240, 2, Kill_Illthidae_-_Morlock_or_Aballin_Trigger
P 1058.0000, 664.0000, 0.0000, 73, 0, 240, 2, Kill_Sea_Snake_-_Snappy_or_Miny_Trigger
P 510.0000, 1337.0000, 0.0000, 73, 0, 240, 2, Kill_Gel_Cube_-_Adarna_or_Green_Eyes_Trigger
P -280.0000, 922.0000, 0.0000, 73, 0, 240, 2, Kill_Eye_of_the_Deep_-_Hive_Mother_or_Crimson_Trigger
P 515.0000, 378.0000, 0.0000, 73, 0, 240, 2, Kill_NTI_-_Life_or_Amanita_Trigger
P -344.0000, 526.0000, 0.0000, 73, 0, 240, 2, Kill_War_Boar_-_Bane_Guard_or_Claw_Trigger
P 478.0000, 322.0000, 0.0000, 73, 0, 240, 2, Kill_Dark_Jellyfish_-_Mycena_or_Death_Trigger
P 34.0000, 334.0000, 0.0000, 73, 0, 240, 2, Kill_Jellyfish_-_Oneup_or_Angler_Trigger
NOTE: Triggered bosses DO NOT spawn where you kill the trigger mob, they will spawn elsewhere in the zone. See TIPS section below for important information on making the location of the spawned bosses much easier to find.
100 Boss List
Below is a table of the 100 bosses, which armor pieces are dropped, and how to spawn them.The bosses are spawned according to 4 different methods:
KILL ALL:
- You must kill all of the specified type of NPC, and the boss will randomly spawn in the zone
RANDOM:
- Killing ANY of the type of the specified type of NPC has a rare chance to spawn the boss randomly in the zone
TIMED:
- Every 30 minutes, a random boss from the "timed" category of bosses will spawn in the zone. You do not have to kill anything for this to happen
Parking 1 toon in an instance to watch for Timed spawns will likely result in going linkdead after 15-20 minutes. Not all people experience this, although the vast
majority do. Park 2 toons per instance at least when camping Timed spawns.
TRIGGER:
- Make sure you have added the trigger text to your map file, as shown in the section above
- Killing the one specific trigger mob of the type of NPC has a chance to start a CHAIN that will always spawn one of two bosses.
- The chain will spawn 2 successive "trash" NPCs, and after killing them will always spawn one of two specified bosses.
- Use "/highlight npc" to see where the chain NPC spawns if you do not use the /highlight npc command before you begin killing the trigger mobs, there is no way you will know if/where one of the successive trash spawns has popped. Using /highlight npc will change all of the current NPC's to a different color, any new NPC that spawns, will show up in the original NPC color for your map.
Source information by Pimpn: http://ezserver.online/forums/index.php?topic=2013.0
Tips
- It might help to keep track of which bosses and loots you have, and which you need. Here is a download link for a printable 100 Boss Checklist:
- This is the first tier that it is almost essential that you have access to a Free Waypoint (Reward Item). The ability to repop this zone will make the last 10 or so bosses MUCH, MUCH easier and faster.
- Use "/stick uw" instead of just "/stick" to make underwater following (slightly) better.
- Upon zoning into the Abyss, it is a good idea to use "/highlight NPC" - this allows new spawns (bosses or chains) to appear in a different color, so that they are easy to identify -
- If you are only after a specific boss, you may want to use "/mapshow nameofnpc" or "/maphide nameofnpc" to see only what you need to kill
- If the last NPC of a "Kill All" boss is a trigger NPC, it will not spawn the "Kill All" boss.
- The accessories that drop here can be upgraded in Anguish so they are worth getting on each character as well as the visible armour
Respawn Time
- 4 hrs
Loot
- Abyss Vellum
- Essence of The Abyss
- Gemstone of the Ages (ultra-rare drop from any mob)
- Kizziebelle's Mythical Unicorn
- Rainbow Crystals (ultra-rare drop from any mob)
- Stone of Heroic Resistance V
- T5 Epic Weapon Skins
- War Bear Saddle


