Difference between revisions of "Tower of Frozen Shadow"
(→Level 5) |
|||
| (40 intermediate revisions by 7 users not shown) | |||
| Line 1: | Line 1: | ||
| − | Tower of Frozen Shadow is a zone primarily used to acquire [[Ultimate Charm]] upgrade tokens, [[Stone of Heroic Resistance]], and [[Essence# | + | Tower of Frozen Shadow is a zone primarily used to acquire [[Ultimate Charm]] upgrade tokens, [[Stone of Heroic Resistance]], and [[Essence#Frozen Shadow|Essence of Frozen Shadow]] (used in making [[Ultimate Weapon]]s) |
| + | |||
| + | '''To port to Tower of Frozen Shadow, target the public porter or pocket porter and /say frozenshadow''' | ||
'''Note''' | '''Note''' | ||
* Movement modifiers such as [[Fastest Travel (Reward Item)]] do not work here, so you must cast them before zoning in. Also, [[Call of the Companions (Reward Item)]] does not work in this zone. You must manually move your team at all times in this zone. | * Movement modifiers such as [[Fastest Travel (Reward Item)]] do not work here, so you must cast them before zoning in. Also, [[Call of the Companions (Reward Item)]] does not work in this zone. You must manually move your team at all times in this zone. | ||
| − | + | * A very useful tactic here for finding [[Amontehepna]] and [[an ice shade|#an ice shade]] without access to a [[Free Waypoint (Reward Item)|Free Waypoint]] is opening a few instances. When uninhabited for over 10 minutes, the instances will depopulate and close down. What this means is, every time you zone in again, the zone will repopulate, giving these 2 mobs a new chance to spawn without having to use a Repop command. If their respective [[Shorthand|PH]] is currently dead, this method will not do anything. | |
== Level 1 == | == Level 1 == | ||
| − | [[File: | + | [[File:ToFS Floor 1 Big Map.jpg|right|thumb|x400px|alt=Alt text|ToFS level 1]] |
The icy floor in this level and the bone pit make this floor difficult to navigate. Cast levitate when you zone in to eliminate the icy floor effect. <br><br> | The icy floor in this level and the bone pit make this floor difficult to navigate. Cast levitate when you zone in to eliminate the icy floor effect. <br><br> | ||
| − | Rarely, one of the mobs in the level (most commonly a gnoll) will spawn the boss of the zone, " | + | Rarely, one of the mobs in the level (most commonly a gnoll) will spawn the [[boss]] of the zone, "[[a large undead gnoll]]" who always drops the key to level 2 (Crystal Key), and rarely drops [[Essence#Frozen Shadow|Essence of Frozen Shadow]] 1 (used in the [[Ultimate Weapon]] quest). ''Each'' one of your characters must collect a key to move on to level 2. Fortunately, the keychain works, so after you use the key the first time, you will no longer need the key on that character.<br><br> |
| − | NPC's in this level drop [[Stone of Heroic Resistance]] 1. These stones can be augged into your gear using an [[Augmentation Sealer]] (purchased from an NPC in the [[Nexus]]), and add + | + | NPC's in this level drop [[Stone of Heroic Resistance]] 1. These stones can be augged into your gear using an [[Augmentation Sealer]] (purchased from an NPC in the [[Nexus]]), and add +15 to all resists per level, ''above'' the resist cap. You can combine two of the same level stones together in the [[magic box]] to make the next level (e.g. [[Stone of Heroic Resistance|stone]] 1 + [[Stone of Heroic Resistance|stone]] 1 = [[Stone of Heroic Resistance|stone]] 2)<br><br> |
| − | I would recommend getting all of your [[Stone of Heroic Resistance]] augs to level 3 or 4 first, before working them higher. A level 3 (+ | + | I would recommend getting all of your [[Stone of Heroic Resistance]] augs to level 3 or 4 first, before working them higher. A level 3 (+45 resist) [[Stone of Heroic Resistance|stone]] takes 4 level 1's to make, whereas a level 4 (+60 resist) takes 8 level 1's to make, a 5 (+75 resist) takes 16, etc...<br><br> |
The NPC's in this zone can drop [[Ultimate Charm|v1 charm upgrades]] for the [[Ultimate Charm]] quest, so this is a good place to work on that, although level 2 has a higher rate of drop.<br><br> | The NPC's in this zone can drop [[Ultimate Charm|v1 charm upgrades]] for the [[Ultimate Charm]] quest, so this is a good place to work on that, although level 2 has a higher rate of drop.<br><br> | ||
| − | The NPC's in this level also drop weapons with bad stats, but can be sold to vendor for between 1500 and | + | The NPC's in this level also drop weapons with bad stats, but can be sold to vendor for between 1500 and 9,000 platinum each to a vendor ([[Summon Newbie Merchant (Reward Item)]], purchased for 10 [[EZ Credit|EZ Credits]] would be useful here), so it can be a good place for a newer player to make cash.<br><br> |
'''Notable Loot''' | '''Notable Loot''' | ||
| − | * Key to ToFS level 2 (always, [[a large undead gnoll]]) | + | * Key to ToFS level 2 (Crystal Key) (always, [[a large undead gnoll]]) |
* [[Slimy Sapphire of Cowardice]] 1 (common, [[a large undead gnoll]]) | * [[Slimy Sapphire of Cowardice]] 1 (common, [[a large undead gnoll]]) | ||
| − | * [[Essence# | + | * [[Essence#Frozen Shadow|Essence of Frozen Shadow]] 1 (rare, [[a large undead gnoll]]) |
* Vendor weapons (common) | * Vendor weapons (common) | ||
* [[Stone of Heroic Resistance]] 1 (common) | * [[Stone of Heroic Resistance]] 1 (common) | ||
| Line 28: | Line 30: | ||
'''Notable NPCs''' | '''Notable NPCs''' | ||
| − | * [[a large undead gnoll]] (Boss) | + | * [[a large undead gnoll]] ([[Boss]]) |
'''Tips''' | '''Tips''' | ||
| Line 34: | Line 36: | ||
== Level 2 == | == Level 2 == | ||
| − | [[File: | + | [[File:ToFS_Floor 2 Big Map.jpg|right|thumb|x400px|alt=Alt text|ToFS level 2]] |
| − | Behind the desk you will see a librarian, but rarely the "Angry Librarian" will be there.The Angry Librarian is the boss and key holder to the next level. If she isn’t up in angry form, don’t worry! Killing the mobs here will eventually spawn her.<br><br> | + | Behind the desk you will see a librarian, but rarely the "[[an angry librarian|Angry Librarian]]" will be there. The [[an angry librarian|Angry Librarian]] is the [[boss]] and key holder (Three Toothed Key) to the next level. If she isn’t up in angry form, don’t worry! Killing the mobs here will eventually spawn her.<br><br> |
| − | Clear the mobs, get more [[Stone of Heroic Resistance|resists stones]] (rank 2 on this level), v1 charm upgrades and ToFS trash loot (the level 71 armor everyone eventually lets rot). Level 2 of Tower of Frozen Shadow has the best droprate for v1 charms on EZServer, so it will greatly benefit your team to stay here, and farm charms and resist stones.<br><br> | + | Clear the mobs, get more [[Stone of Heroic Resistance|resists stones]] (rank 2 on this level), v1 charm upgrades and ToFS trash loot (the level 71 armor everyone eventually lets rot). Level 2 of Tower of Frozen Shadow has the best droprate for v1 charms on EZServer, so it will greatly benefit your team to stay here, and farm charms and [[Stone of Heroic Resistance|resist stones]].<br><br> |
'''Notable Loot:''' | '''Notable Loot:''' | ||
| − | * Key to ToFS level 3 (always, [[an angry librarian]]) | + | * Key to ToFS level 3 (Three Toothed Key) (always, [[an angry librarian]]) |
* [[Student's Homework]] (common, [[an angry librarian]]) | * [[Student's Homework]] (common, [[an angry librarian]]) | ||
| − | * [[Essence# | + | * [[Essence#Frozen Shadow|Essence of Frozen Shadow]] 2 (rare, [[an angry librarian]]) |
* [[Stone of Heroic Resistance]] 2 (common) | * [[Stone of Heroic Resistance]] 2 (common) | ||
* [[Ultimate Charm|v1 charm upgrades]] (common) | * [[Ultimate Charm|v1 charm upgrades]] (common) | ||
'''Notable NPCs''' | '''Notable NPCs''' | ||
| − | * [[an angry librarian]] (boss) | + | * [[an angry librarian]] ([[boss]]) |
| + | |||
| + | |||
| + | |||
| + | |||
| + | |||
== Level 3 == | == Level 3 == | ||
| − | [[File: | + | [[File:ToFS Floor 3 Big Map.jpg|right|thumb|x400px|alt=Alt text|ToFS level 3]] |
Level three is the kitchen, dining area and servants quarters. This level is gnolls, suits of armor, skeletons and undead maids/butlers. Nasty little AE’s from most of them, and often you will get clumps of 2 - 8 at once if not careful. The mobs here hit a bit harder….around [[Halls of Honor]]/T3 level.<br><br> | Level three is the kitchen, dining area and servants quarters. This level is gnolls, suits of armor, skeletons and undead maids/butlers. Nasty little AE’s from most of them, and often you will get clumps of 2 - 8 at once if not careful. The mobs here hit a bit harder….around [[Halls of Honor]]/T3 level.<br><br> | ||
The key holder ([[an enraged shadow beast]]) is a LOT more powerful than the other mobs, and can self buff with | The key holder ([[an enraged shadow beast]]) is a LOT more powerful than the other mobs, and can self buff with | ||
| − | Stonewall ([[mitigation]]). Every mob in the level is his placeholder, so keep killing and he will eventually spawn.<br><br> | + | Stonewall ([[mitigation]]). He is the one that drops the (Frosty Key) Every mob in the level is his placeholder, so keep killing and he will eventually spawn.<br><br> |
Go right from zone in, around the corner past the kitchen and dining hall to a small set of stairs down into the maid/butler area. In back by the maid’s beds is a mirror out to Iceclad. Past this area and down the hall, around several turns, is the mirror up to level 4<br><br> | Go right from zone in, around the corner past the kitchen and dining hall to a small set of stairs down into the maid/butler area. In back by the maid’s beds is a mirror out to Iceclad. Past this area and down the hall, around several turns, is the mirror up to level 4<br><br> | ||
'''Notable Loot''' | '''Notable Loot''' | ||
| − | * Key to ToFS level 4 (always, [[an enraged shadow beast]]) | + | * Key to ToFS level 4 (Frosty Key) (always, [[an enraged shadow beast]]) |
* [[Chilled Scythe]] (common, [[an enraged shadow beast]]) | * [[Chilled Scythe]] (common, [[an enraged shadow beast]]) | ||
* [[Finely Crafted Velium Ring]] (common, [[an enraged shadow beast]]) | * [[Finely Crafted Velium Ring]] (common, [[an enraged shadow beast]]) | ||
| − | * [[Essence# | + | * [[Essence#Frozen Shadow|Essence of Frozen Shadow]] 3 (rare, [[an enraged shadow beast]]) |
* [[Ultimate Charm|v1 charm upgrades]] (rare) | * [[Ultimate Charm|v1 charm upgrades]] (rare) | ||
* [[Ultimate Charm|v2 charm upgrades]] (rare) | * [[Ultimate Charm|v2 charm upgrades]] (rare) | ||
| Line 71: | Line 78: | ||
== Level 4 == | == Level 4 == | ||
| − | [[File: | + | [[File:ToFS Floor 4 Big Map.jpg|right|thumb|x400px|alt=Alt text|ToFS level 4]] |
Level 4 is a mazelike level. The zonein is NOT safe, so you will need to immediately start fighting, although there is a safe area in the central northwest area of the zone (it appears as a largish rectangle on the map).<br><br> | Level 4 is a mazelike level. The zonein is NOT safe, so you will need to immediately start fighting, although there is a safe area in the central northwest area of the zone (it appears as a largish rectangle on the map).<br><br> | ||
| − | The boss of this floor is Cara Omica, who drops a dagger that can summon 10k hp food, the key to level 5, and rarely the [[essence]] for this level.<br><br> | + | The [[boss]] of this floor is [[Cara Omica]], who drops a dagger that can summon 10k hp food, the key to level 5 (small rusty key), and rarely the [[essence]] for this level.<br><br> |
| − | To spawn Cara, you need to kill [[Amontehepna]], and Cara will spawn in the center of the zone, near the zoneout. | + | To spawn [[Cara Omica|Cara]], you need to kill [[Amontehepna]], and [[Cara Omica|Cara]] will spawn in the center of the zone, near the zoneout. [[Amontehepna]] can be up with a repop, so you can continuously repop the zone to get [[Amontehepna]] to spawn. "/target amon" works to check if he is up. Additionally, if you do not have access to a [[Free Waypoint (Reward Item)|Free Waypoint]] to use this method, [[Amontehepna]] will also spawn rarely out of a mob killed on the floor, similar to the Key Droppers of other floors.<br><br> |
| + | If you fall into the lower level there is a pot you can click under where [[Cara Omica|Cara]] spawns to get ported back to the entrance to the floor.<br><br> | ||
'''Notable Loot''' | '''Notable Loot''' | ||
| − | * Key to ToFS level 5 (always, [[Cara Omica]]) | + | * Key to ToFS level 5 (small rusty key) (always, [[Cara Omica]]) |
* [[Sorcerous Bowl]] (common, [[Cara Omica]]) | * [[Sorcerous Bowl]] (common, [[Cara Omica]]) | ||
* [[Magnetic Dirk of Distraction]] (common, [[Cara Omica]]) | * [[Magnetic Dirk of Distraction]] (common, [[Cara Omica]]) | ||
| − | * [[Embalmer's Skinning Knife]] ( | + | * [[Embalmer's Skinning Knife]] (semi-rare, [[Cara Omica]]) - Summons [[Mystery Meat]] |
| − | * [[Essence# | + | * [[Essence#Frozen Shadow|Essence of Frozen Shadow]] 4 (rare, [[Cara Omica]]) |
* [[Prophecy Scroll]] (common, [[Amontehepna]]) | * [[Prophecy Scroll]] (common, [[Amontehepna]]) | ||
* [[Sparkling Soul Necklace]] (common, [[Amontehepna]]) | * [[Sparkling Soul Necklace]] (common, [[Amontehepna]]) | ||
| Line 86: | Line 94: | ||
* [[Fingerbone Necklace]] (common, [[Maggot Infested Flesh]]) | * [[Fingerbone Necklace]] (common, [[Maggot Infested Flesh]]) | ||
* [[Frost Covered Tome]] (common, [[Narmak Berreka]]) | * [[Frost Covered Tome]] (common, [[Narmak Berreka]]) | ||
| + | * [[Shield of Shadows]] (common, [[Narmak Berreka]]) | ||
* [[Ultimate Charm|v2 charm upgrades]] (rare) | * [[Ultimate Charm|v2 charm upgrades]] (rare) | ||
* [[Stone of Heroic Resistance]] 4 (common) | * [[Stone of Heroic Resistance]] 4 (common) | ||
'''Notable NPCs''' | '''Notable NPCs''' | ||
| − | * [[Cara Omica]] (boss) | + | * [[Cara Omica]] ([[boss]]) |
* [[Amontehepna]] (PH for [[Cara Omica]]) | * [[Amontehepna]] (PH for [[Cara Omica]]) | ||
* [[maggot infested flesh]] | * [[maggot infested flesh]] | ||
| Line 95: | Line 104: | ||
== Level 5 == | == Level 5 == | ||
| − | [[File: | + | [[File:ToFS Floor 5 Big Map.jpg|right|thumb|x400px|alt=Alt text|ToFS level 5]] |
Level 5 is the wedding party. You MUST have over 1600 [[Stone of Heroic Resistance|resists]] to survive on this level.<br><br> | Level 5 is the wedding party. You MUST have over 1600 [[Stone of Heroic Resistance|resists]] to survive on this level.<br><br> | ||
| − | The boss of this floor is the [[an enraged relative]], who is spawned by killing any NPC on the level, but more commonly from the wedding party.<br><br> | + | The [[boss]] of this floor is the [[an enraged relative]], who is spawned by killing any NPC on the level, but more commonly from the wedding party. He always drops the Key to ToFS level 6 (Bone Finger Key). <br><br> |
| − | Nosja or | + | Nosja or Daman will rarely drop the [[Ceremonial Wedding Sword]]. The [[Roaming Gnome]], located in level 1, gives the [[Ornate War Sword]] quest. To complete the quest, get the quest from the gnome, then give the [[Ceremonial Wedding Sword]] back to him (in the [[Caster's Guild Quest|Caster's Guild]]). This will give your pets their [[Ornate War Sword|v3 pet weapons]].<br><br> |
'''Notable Loot''' | '''Notable Loot''' | ||
| − | * Key to ToFS level 6 (always, [[an enraged relative]]) | + | * Key to ToFS level 6 (Bone Finger Key) (always, [[an enraged relative]]) |
| − | * [[Essence# | + | * [[Essence#Frozen Shadow|Essence of Frozen Shadow]] 5 (rare, [[an enraged relative]]) |
* [[Beer Stained Coldain Tunic]] (common, [[an enraged relative]]) | * [[Beer Stained Coldain Tunic]] (common, [[an enraged relative]]) | ||
* [[Velium Spiked Skull Helm]] (common, [[an enraged relative]]) | * [[Velium Spiked Skull Helm]] (common, [[an enraged relative]]) | ||
* [[Laced Veil]] (rare) | * [[Laced Veil]] (rare) | ||
* [[Ultimate Charm|v2 charm upgrades]] (rare) | * [[Ultimate Charm|v2 charm upgrades]] (rare) | ||
| − | |||
* [[Stone of Heroic Resistance]] 5 (common) | * [[Stone of Heroic Resistance]] 5 (common) | ||
| − | * [[Ceremonial Wedding Sword]] (rare, Nosja or | + | * [[Ceremonial Wedding Sword]] (rare, Nosja or Daman) |
* [[Rune Etched Wedding Band]] (rare) | * [[Rune Etched Wedding Band]] (rare) | ||
* 300-1200 platinum | * 300-1200 platinum | ||
'''Notable NPCs''' | '''Notable NPCs''' | ||
| − | * [[an enraged relative]] (boss) | + | * [[an enraged relative]] ([[boss]]) |
== Level 6 == | == Level 6 == | ||
| − | [[File: | + | [[File:ToFS Floor 6a Big Map.jpg|right|thumb|x400px|alt=Alt text|ToFS level 6a]] |
| − | [[File: | + | [[File:ToFS Floor 6b Big Map.jpg|right|thumb|x400px|alt=Alt text|ToFS level 6b]] |
| − | This level is divided into two sections, "6a" and "6b". "6a" is where you kill the placeholder ("#an Ice Shade"), and 6b is where you kill the boss of the floor ([[VhalSera]]).<br><br> | + | This level is divided into two sections, "6a" and "6b". "6a" is where you kill the placeholder ("#an Ice Shade"), and 6b is where you kill the [[boss]] of the floor ([[VhalSera]]) who drops the Key to ToFS level 7 (Large Metal Key).<br><br> |
| − | 1600 [[Stone of Heroic Resistance|resist]] is still good on this level. You are looking for "#an Ice Shade" to pop here to get a key mob to spawn. The one with the "#" will spawn the boss of the level 100% of the time. The one with the "#" will ''not'' have white stripes on its cloak, like the rest of the shades, but will have an all black cloak instead.<br><br> | + | 1600 [[Stone of Heroic Resistance|resist]] is still good on this level. You are looking for "#an Ice Shade" to pop here to get a key mob to spawn. The one with the "#" will spawn the [[boss]] of the level 100% of the time. The one with the "#" will ''not'' have white stripes on its cloak, like the rest of the shades, but will have an all black cloak instead.<br><br> |
| − | There are 2 locations that | + | There are 2 locations that [[an ice shade|#an ice shade]] can spawn |
# From port in take first left, follow it all the way around, looks like a hook. He can spawn at the south end of the hook. | # From port in take first left, follow it all the way around, looks like a hook. He can spawn at the south end of the hook. | ||
# In the thrown room, to the left of the throne on the west end.<br> | # In the thrown room, to the left of the throne on the west end.<br> | ||
| − | You can either pull/kill PH's or repop zone over and over until "#an Ice Shade" pops. Once he is killed, [[VhalSera]] will pop, and | + | You can target this mob by using "/tar #an_i" using an underscore, not a space. You can either pull/kill PH's or repop zone over and over until "#an Ice Shade" pops. Once he is killed, [[VhalSera]] will pop, and he holds the key. Additionally, if you do not have access to a [[Free Waypoint (Reward Item)|Free Waypoint]] to use the repop method, [[VhalSera]] will also spawn rarely after a mob killed on either floor. He will spawn in the same location as the [[an ice shade|#an Ice Shade]] method.<br><br> |
| − | To get to | + | To get to him, from the zonein take the first right and follow it up and around to the mirror, which will take you to the second area of level 6. Once in 6b, [[VhalSera]] is located in the room filled with bats up the stairs. It is ''very'' difficult to pull him alone, so expect several bat adds to come along. After [[VhalSera]] is dead, to get off his little island, there is a mirror located underneath the stairs in front of the zonein of level 6b.<br><br> |
Once your whole team has keys to level 7, go up the stairs on 6b where [[VhalSera]] spawn and go right. In the back there is a room with a red crystal on the wall. Clicking the crystal will take you to level 7.<br><br> | Once your whole team has keys to level 7, go up the stairs on 6b where [[VhalSera]] spawn and go right. In the back there is a room with a red crystal on the wall. Clicking the crystal will take you to level 7.<br><br> | ||
'''Notable Loot''' | '''Notable Loot''' | ||
| − | * Key to ToFS level 7 (always, [[VhalSera]]) | + | * Key to ToFS level 7 (Large Metal Key) (always, [[VhalSera]]) |
* [[Talisman of Vhal Sera]] (common, [[VhalSera]]) | * [[Talisman of Vhal Sera]] (common, [[VhalSera]]) | ||
* [[VhalSera Skull Earring]] (common, [[VhalSera]]) | * [[VhalSera Skull Earring]] (common, [[VhalSera]]) | ||
| − | * [[Essence# | + | * [[Essence#Frozen Shadow|Essence of Frozen Shadow]] 6 (rare, [[VhalSera]])\ |
| + | * [[Abram's Axe of the Stoic]] (rare trash drop) | ||
* [[Ultimate Charm|v2 charm upgrades]] (rare) | * [[Ultimate Charm|v2 charm upgrades]] (rare) | ||
* [[Stone of Heroic Resistance]] 6 (common) | * [[Stone of Heroic Resistance]] 6 (common) | ||
'''Notable NPCs''' | '''Notable NPCs''' | ||
| − | * #an Ice Shade (PH for boss) | + | * #an Ice Shade ([[Shorthand|PH]] for [[boss]]) |
| − | * [[VhalSera]] (boss) | + | * [[VhalSera]] ([[boss]]) |
== Level 7 == | == Level 7 == | ||
| − | [[File: | + | [[File:ToFS Floor 7 Big Map.jpg|right|thumb|x400px|alt=Alt text|ToFS level 7]] |
Kill "#a shrouded bat" to spawn [[Tserrina Syl`Tor|Tserrina]]. Any of the bats with the "#" can spawn [[Tserrina Syl`Tor|Tserrina]] upon death. There are 4 PH bats in the north wing, and 3 in the upstairs wing.<br><br> | Kill "#a shrouded bat" to spawn [[Tserrina Syl`Tor|Tserrina]]. Any of the bats with the "#" can spawn [[Tserrina Syl`Tor|Tserrina]] upon death. There are 4 PH bats in the north wing, and 3 in the upstairs wing.<br><br> | ||
There is a death trap, just at the end of the first hall from the mirror up. People walking through the trap take varying amounts of damage, and random. but most toons under 750k HP's will go down. Run your tank through and rez the rest up. | There is a death trap, just at the end of the first hall from the mirror up. People walking through the trap take varying amounts of damage, and random. but most toons under 750k HP's will go down. Run your tank through and rez the rest up. | ||
| Line 154: | Line 163: | ||
Tserrina drops [[Tserrina's Whip]], a very good weapon for melee classes, since it has a slot for type 8 AND 22 augs and several caster centric items. She always drops [[Tserrina's Key]], which allows you to use the mirror room teleport from level 1 to get to any level. She rarely drops an [[essence]] of Frozen Shadow 7 and rarely will spawn [[Advisor Svartmane]] upon her death.<br><br> | Tserrina drops [[Tserrina's Whip]], a very good weapon for melee classes, since it has a slot for type 8 AND 22 augs and several caster centric items. She always drops [[Tserrina's Key]], which allows you to use the mirror room teleport from level 1 to get to any level. She rarely drops an [[essence]] of Frozen Shadow 7 and rarely will spawn [[Advisor Svartmane]] upon her death.<br><br> | ||
| − | [[Advisor Svartmane|Svartmane]] will spawn in the north room in the north wing. He always drops [[Essence# | + | [[Advisor Svartmane|Svartmane]] will spawn in the north room in the north wing. He always drops [[Essence#Frozen Shadow|Master Essence of Frozen Shadow]], and a few other goodies, including [[Spirit of the Ninja]]. |
| − | The [[Essence# | + | The [[Essence#Frozen Shadow|Master Essence]] can be substituted for any of the lower tier [[Essence#Frozen Shadow|Essence of Frozen Shadow]] when making [[Ultimate Weapon]]s. |
'''Notable Loot''' | '''Notable Loot''' | ||
* [[Tserrina's Key]] (Always, [[Tserrina Syl`Tor|Tserrina]]) | * [[Tserrina's Key]] (Always, [[Tserrina Syl`Tor|Tserrina]]) | ||
| − | * [[Essence# | + | * [[Essence#Frozen Shadow|Essence of Frozen Shadow]] 7 (Rare, [[Tserrina Syl`Tor|Tserrina]]) |
* [[Tserrina's Staff]] (common, [[Tserrina Syl`Tor|Tserrina]]) | * [[Tserrina's Staff]] (common, [[Tserrina Syl`Tor|Tserrina]]) | ||
* [[Tserrina's Symbol]] (common, [[Tserrina Syl`Tor|Tserrina]]) | * [[Tserrina's Symbol]] (common, [[Tserrina Syl`Tor|Tserrina]]) | ||
| Line 166: | Line 175: | ||
* [[Harnessed Soul Gem]] (common, [[Tserrina Syl`Tor|Tserrina]]) | * [[Harnessed Soul Gem]] (common, [[Tserrina Syl`Tor|Tserrina]]) | ||
* [[Tserrina's Whip]] (common, [[Tserrina Syl`Tor|Tserrina]]) | * [[Tserrina's Whip]] (common, [[Tserrina Syl`Tor|Tserrina]]) | ||
| − | * [[Essence# | + | * [[Essence#Frozen Shadow|Master Essence of Frozen Shadow]] (Always, [[Advisor Svartmane]]) |
* [[Spirit of the Ninja]] (Always, [[Advisor Svartmane]]) | * [[Spirit of the Ninja]] (Always, [[Advisor Svartmane]]) | ||
* [[Ultimate Charm|v2 charm upgrades]] (rare) | * [[Ultimate Charm|v2 charm upgrades]] (rare) | ||
| − | |||
* [[Stone of Heroic Resistance]] 7 (common) | * [[Stone of Heroic Resistance]] 7 (common) | ||
Latest revision as of 13:40, 21 February 2024
Tower of Frozen Shadow is a zone primarily used to acquire Ultimate Charm upgrade tokens, Stone of Heroic Resistance, and Essence of Frozen Shadow (used in making Ultimate Weapons)
To port to Tower of Frozen Shadow, target the public porter or pocket porter and /say frozenshadow
Note
- Movement modifiers such as Fastest Travel (Reward Item) do not work here, so you must cast them before zoning in. Also, Call of the Companions (Reward Item) does not work in this zone. You must manually move your team at all times in this zone.
- A very useful tactic here for finding Amontehepna and #an ice shade without access to a Free Waypoint is opening a few instances. When uninhabited for over 10 minutes, the instances will depopulate and close down. What this means is, every time you zone in again, the zone will repopulate, giving these 2 mobs a new chance to spawn without having to use a Repop command. If their respective PH is currently dead, this method will not do anything.
Level 1
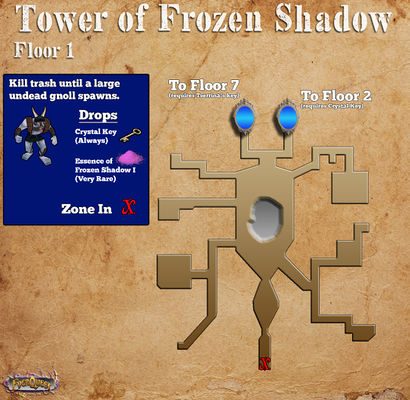
The icy floor in this level and the bone pit make this floor difficult to navigate. Cast levitate when you zone in to eliminate the icy floor effect.
Rarely, one of the mobs in the level (most commonly a gnoll) will spawn the boss of the zone, "a large undead gnoll" who always drops the key to level 2 (Crystal Key), and rarely drops Essence of Frozen Shadow 1 (used in the Ultimate Weapon quest). Each one of your characters must collect a key to move on to level 2. Fortunately, the keychain works, so after you use the key the first time, you will no longer need the key on that character.
NPC's in this level drop Stone of Heroic Resistance 1. These stones can be augged into your gear using an Augmentation Sealer (purchased from an NPC in the Nexus), and add +15 to all resists per level, above the resist cap. You can combine two of the same level stones together in the magic box to make the next level (e.g. stone 1 + stone 1 = stone 2)
I would recommend getting all of your Stone of Heroic Resistance augs to level 3 or 4 first, before working them higher. A level 3 (+45 resist) stone takes 4 level 1's to make, whereas a level 4 (+60 resist) takes 8 level 1's to make, a 5 (+75 resist) takes 16, etc...
The NPC's in this zone can drop v1 charm upgrades for the Ultimate Charm quest, so this is a good place to work on that, although level 2 has a higher rate of drop.
The NPC's in this level also drop weapons with bad stats, but can be sold to vendor for between 1500 and 9,000 platinum each to a vendor (Summon Newbie Merchant (Reward Item), purchased for 10 EZ Credits would be useful here), so it can be a good place for a newer player to make cash.
Notable Loot
- Key to ToFS level 2 (Crystal Key) (always, a large undead gnoll)
- Slimy Sapphire of Cowardice 1 (common, a large undead gnoll)
- Essence of Frozen Shadow 1 (rare, a large undead gnoll)
- Vendor weapons (common)
- Stone of Heroic Resistance 1 (common)
- v1 charm upgrades (rare)
Notable NPCs
Tips
- Summon Newbie Merchant (Reward Item) is useful in this level to allow you to immediately sell the weapons you collect
Level 2
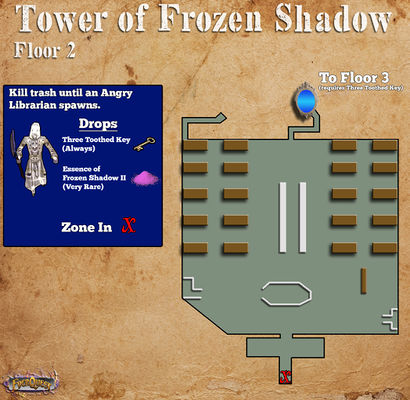
Behind the desk you will see a librarian, but rarely the "Angry Librarian" will be there. The Angry Librarian is the boss and key holder (Three Toothed Key) to the next level. If she isn’t up in angry form, don’t worry! Killing the mobs here will eventually spawn her.
Clear the mobs, get more resists stones (rank 2 on this level), v1 charm upgrades and ToFS trash loot (the level 71 armor everyone eventually lets rot). Level 2 of Tower of Frozen Shadow has the best droprate for v1 charms on EZServer, so it will greatly benefit your team to stay here, and farm charms and resist stones.
Notable Loot:
- Key to ToFS level 3 (Three Toothed Key) (always, an angry librarian)
- Student's Homework (common, an angry librarian)
- Essence of Frozen Shadow 2 (rare, an angry librarian)
- Stone of Heroic Resistance 2 (common)
- v1 charm upgrades (common)
Notable NPCs
Level 3
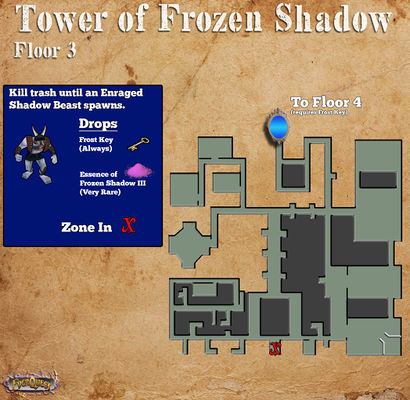
Level three is the kitchen, dining area and servants quarters. This level is gnolls, suits of armor, skeletons and undead maids/butlers. Nasty little AE’s from most of them, and often you will get clumps of 2 - 8 at once if not careful. The mobs here hit a bit harder….around Halls of Honor/T3 level.
The key holder (an enraged shadow beast) is a LOT more powerful than the other mobs, and can self buff with
Stonewall (mitigation). He is the one that drops the (Frosty Key) Every mob in the level is his placeholder, so keep killing and he will eventually spawn.
Go right from zone in, around the corner past the kitchen and dining hall to a small set of stairs down into the maid/butler area. In back by the maid’s beds is a mirror out to Iceclad. Past this area and down the hall, around several turns, is the mirror up to level 4
Notable Loot
- Key to ToFS level 4 (Frosty Key) (always, an enraged shadow beast)
- Chilled Scythe (common, an enraged shadow beast)
- Finely Crafted Velium Ring (common, an enraged shadow beast)
- Essence of Frozen Shadow 3 (rare, an enraged shadow beast)
- v1 charm upgrades (rare)
- v2 charm upgrades (rare)
- Stone of Heroic Resistance 3 (common)
Notable NPCs
Level 4
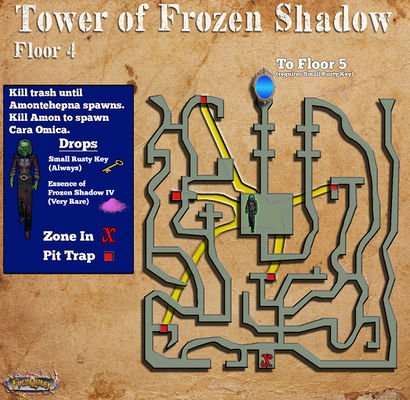
Level 4 is a mazelike level. The zonein is NOT safe, so you will need to immediately start fighting, although there is a safe area in the central northwest area of the zone (it appears as a largish rectangle on the map).
The boss of this floor is Cara Omica, who drops a dagger that can summon 10k hp food, the key to level 5 (small rusty key), and rarely the essence for this level.
To spawn Cara, you need to kill Amontehepna, and Cara will spawn in the center of the zone, near the zoneout. Amontehepna can be up with a repop, so you can continuously repop the zone to get Amontehepna to spawn. "/target amon" works to check if he is up. Additionally, if you do not have access to a Free Waypoint to use this method, Amontehepna will also spawn rarely out of a mob killed on the floor, similar to the Key Droppers of other floors.
If you fall into the lower level there is a pot you can click under where Cara spawns to get ported back to the entrance to the floor.
Notable Loot
- Key to ToFS level 5 (small rusty key) (always, Cara Omica)
- Sorcerous Bowl (common, Cara Omica)
- Magnetic Dirk of Distraction (common, Cara Omica)
- Embalmer's Skinning Knife (semi-rare, Cara Omica) - Summons Mystery Meat
- Essence of Frozen Shadow 4 (rare, Cara Omica)
- Prophecy Scroll (common, Amontehepna)
- Sparkling Soul Necklace (common, Amontehepna)
- Maggot Ridden Flesh (common, Maggot Infested Flesh)
- Fingerbone Necklace (common, Maggot Infested Flesh)
- Frost Covered Tome (common, Narmak Berreka)
- Shield of Shadows (common, Narmak Berreka)
- v2 charm upgrades (rare)
- Stone of Heroic Resistance 4 (common)
Notable NPCs
Level 5
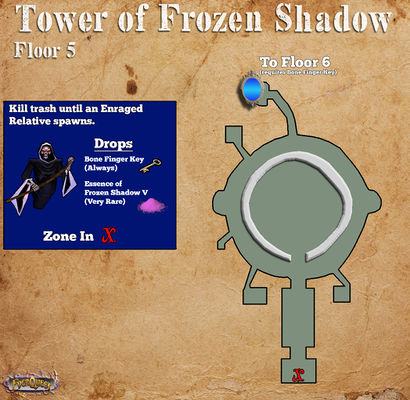
Level 5 is the wedding party. You MUST have over 1600 resists to survive on this level.
The boss of this floor is the an enraged relative, who is spawned by killing any NPC on the level, but more commonly from the wedding party. He always drops the Key to ToFS level 6 (Bone Finger Key).
Nosja or Daman will rarely drop the Ceremonial Wedding Sword. The Roaming Gnome, located in level 1, gives the Ornate War Sword quest. To complete the quest, get the quest from the gnome, then give the Ceremonial Wedding Sword back to him (in the Caster's Guild). This will give your pets their v3 pet weapons.
Notable Loot
- Key to ToFS level 6 (Bone Finger Key) (always, an enraged relative)
- Essence of Frozen Shadow 5 (rare, an enraged relative)
- Beer Stained Coldain Tunic (common, an enraged relative)
- Velium Spiked Skull Helm (common, an enraged relative)
- Laced Veil (rare)
- v2 charm upgrades (rare)
- Stone of Heroic Resistance 5 (common)
- Ceremonial Wedding Sword (rare, Nosja or Daman)
- Rune Etched Wedding Band (rare)
- 300-1200 platinum
Notable NPCs
Level 6
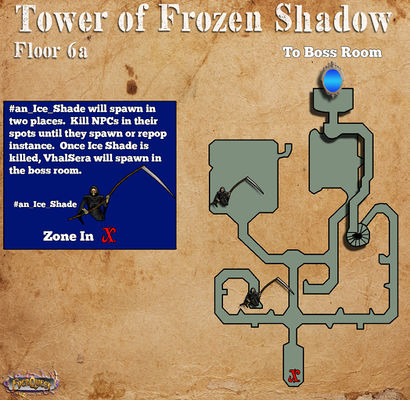
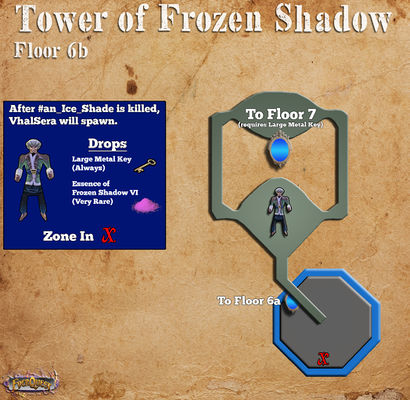
This level is divided into two sections, "6a" and "6b". "6a" is where you kill the placeholder ("#an Ice Shade"), and 6b is where you kill the boss of the floor (VhalSera) who drops the Key to ToFS level 7 (Large Metal Key).
1600 resist is still good on this level. You are looking for "#an Ice Shade" to pop here to get a key mob to spawn. The one with the "#" will spawn the boss of the level 100% of the time. The one with the "#" will not have white stripes on its cloak, like the rest of the shades, but will have an all black cloak instead.
There are 2 locations that #an ice shade can spawn
- From port in take first left, follow it all the way around, looks like a hook. He can spawn at the south end of the hook.
- In the thrown room, to the left of the throne on the west end.
You can target this mob by using "/tar #an_i" using an underscore, not a space. You can either pull/kill PH's or repop zone over and over until "#an Ice Shade" pops. Once he is killed, VhalSera will pop, and he holds the key. Additionally, if you do not have access to a Free Waypoint to use the repop method, VhalSera will also spawn rarely after a mob killed on either floor. He will spawn in the same location as the #an Ice Shade method.
To get to him, from the zonein take the first right and follow it up and around to the mirror, which will take you to the second area of level 6. Once in 6b, VhalSera is located in the room filled with bats up the stairs. It is very difficult to pull him alone, so expect several bat adds to come along. After VhalSera is dead, to get off his little island, there is a mirror located underneath the stairs in front of the zonein of level 6b.
Once your whole team has keys to level 7, go up the stairs on 6b where VhalSera spawn and go right. In the back there is a room with a red crystal on the wall. Clicking the crystal will take you to level 7.
Notable Loot
- Key to ToFS level 7 (Large Metal Key) (always, VhalSera)
- Talisman of Vhal Sera (common, VhalSera)
- VhalSera Skull Earring (common, VhalSera)
- Essence of Frozen Shadow 6 (rare, VhalSera)\
- Abram's Axe of the Stoic (rare trash drop)
- v2 charm upgrades (rare)
- Stone of Heroic Resistance 6 (common)
Notable NPCs
Level 7
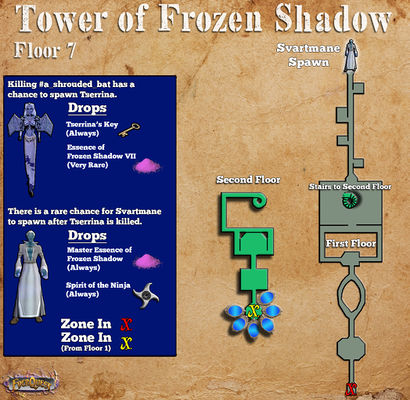
Kill "#a shrouded bat" to spawn Tserrina. Any of the bats with the "#" can spawn Tserrina upon death. There are 4 PH bats in the north wing, and 3 in the upstairs wing.
There is a death trap, just at the end of the first hall from the mirror up. People walking through the trap take varying amounts of damage, and random. but most toons under 750k HP's will go down. Run your tank through and rez the rest up.
Tserrina drops Tserrina's Whip, a very good weapon for melee classes, since it has a slot for type 8 AND 22 augs and several caster centric items. She always drops Tserrina's Key, which allows you to use the mirror room teleport from level 1 to get to any level. She rarely drops an essence of Frozen Shadow 7 and rarely will spawn Advisor Svartmane upon her death.
Svartmane will spawn in the north room in the north wing. He always drops Master Essence of Frozen Shadow, and a few other goodies, including Spirit of the Ninja.
The Master Essence can be substituted for any of the lower tier Essence of Frozen Shadow when making Ultimate Weapons.
Notable Loot
- Tserrina's Key (Always, Tserrina)
- Essence of Frozen Shadow 7 (Rare, Tserrina)
- Tserrina's Staff (common, Tserrina)
- Tserrina's Symbol (common, Tserrina)
- Tserrina's Robe (common, Tserrina)
- Harnessed Soul Gem (common, Tserrina)
- Tserrina's Whip (common, Tserrina)
- Master Essence of Frozen Shadow (Always, Advisor Svartmane)
- Spirit of the Ninja (Always, Advisor Svartmane)
- v2 charm upgrades (rare)
- Stone of Heroic Resistance 7 (common)
Notable NPCs
