Difference between revisions of "Ultimate Augment"
| Line 35: | Line 35: | ||
<gallery mode="packed-hover" widths=200px heights=300px> | <gallery mode="packed-hover" widths=200px heights=300px> | ||
Image:was1.png|Wide Arc Swing|link={{filepath:was1.png}} | Image:was1.png|Wide Arc Swing|link={{filepath:was1.png}} | ||
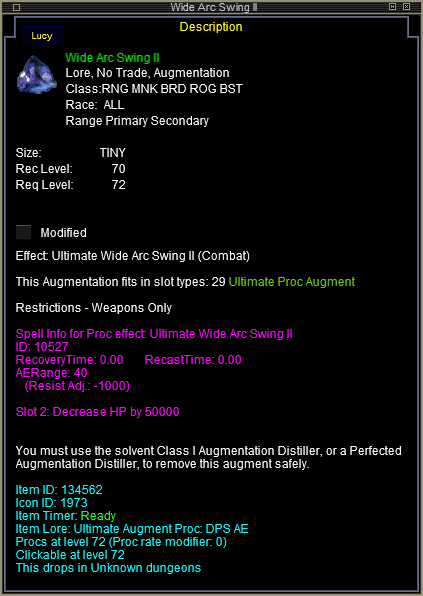
| − | Image: | + | Image:was2.png|Wide Arc Swing II|link={{filepath:was2.png}} |
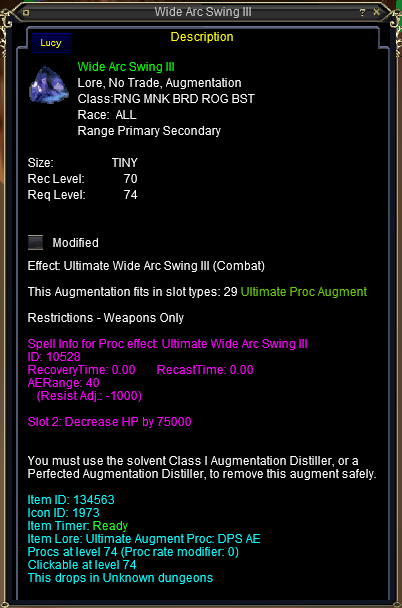
Image:was3.png|Wide Arc Swing III|link={{filepath:was3.png}} | Image:was3.png|Wide Arc Swing III|link={{filepath:was3.png}} | ||
Image:was4.png|Wide Arc Swing IV|link={{filepath:was4.png}} | Image:was4.png|Wide Arc Swing IV|link={{filepath:was4.png}} | ||
| Line 43: | Line 43: | ||
<gallery mode="packed-hover" widths=200px heights=300px> | <gallery mode="packed-hover" widths=200px heights=300px> | ||
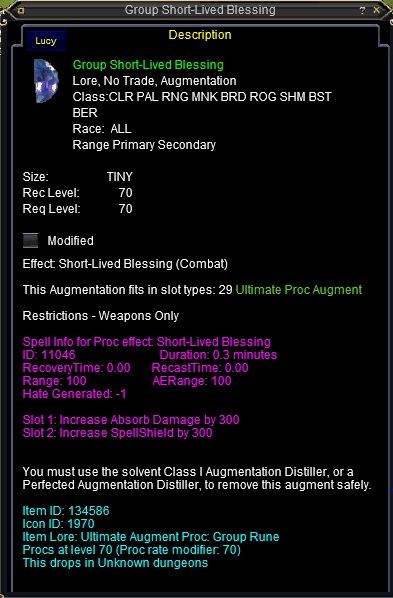
Image:Gslb1.png|Group Short-Lived Blessing|link={{filepath:Gslb1.png}} | Image:Gslb1.png|Group Short-Lived Blessing|link={{filepath:Gslb1.png}} | ||
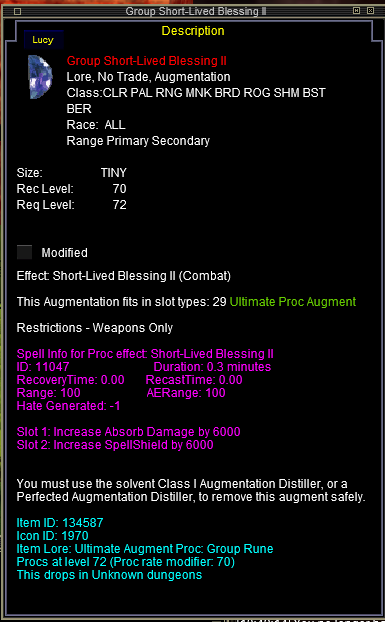
| − | Image: | + | Image:gslb2.png|Group Short-Lived Blessing II|link={{filepath:gslb2.png}} |
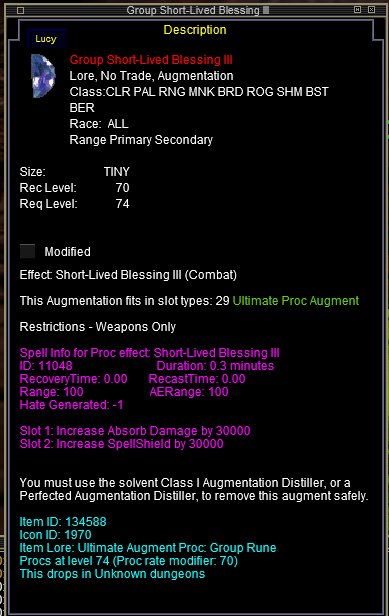
| − | Image: | + | Image:gslb3.png|Group Short-Lived Blessing III|link={{filepath:gslb3.png}} |
Image:Gslb4.png|Group Short-Lived Blessing IV|link={{filepath:Gslb4.png}} | Image:Gslb4.png|Group Short-Lived Blessing IV|link={{filepath:Gslb4.png}} | ||
</gallery> | </gallery> | ||
| Line 51: | Line 51: | ||
<gallery mode="packed-hover" widths=200px heights=300px> | <gallery mode="packed-hover" widths=200px heights=300px> | ||
Image:lfp1.png|Life From Pain|link={{filepath:lfp1.png}} | Image:lfp1.png|Life From Pain|link={{filepath:lfp1.png}} | ||
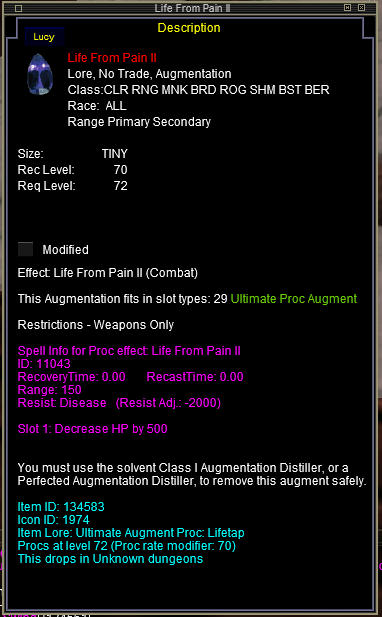
| − | Image: | + | Image:lfp2.png|Life From Pain II|link={{filepath:lfp2.png}} |
| − | Image: | + | Image:lfp3.png|Life From Pain III|link={{filepath:lfp3.png}} |
| − | Image: | + | Image:lfp4.png|Life From Pain IV|link={{filepath:lfp4.png}} |
</gallery> | </gallery> | ||
| Line 59: | Line 59: | ||
<gallery mode="packed-hover" widths=200px heights=300px> | <gallery mode="packed-hover" widths=200px heights=300px> | ||
Image:gcs1.png|Group Chromatic Shield|link={{filepath:gcs1.png}} | Image:gcs1.png|Group Chromatic Shield|link={{filepath:gcs1.png}} | ||
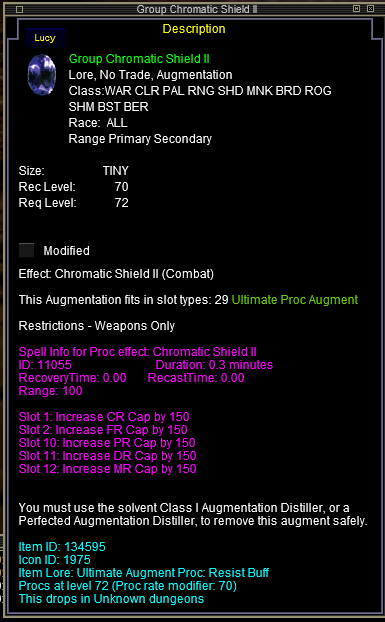
| − | Image: | + | Image:gcs2.png|Group Chromatic Shield II|link={{filepath:gcs2.png}} |
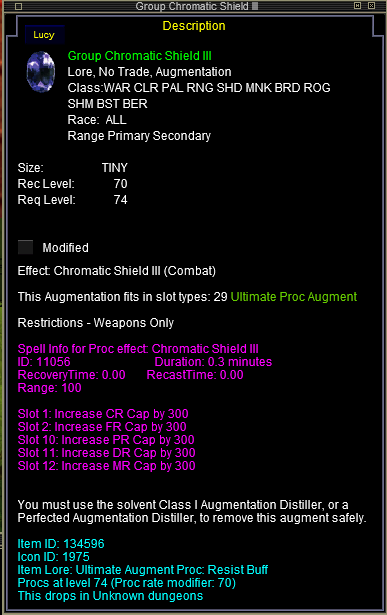
| − | Image: | + | Image:gcs3.png|Group Chromatic Shield III|link={{filepath:gcs3.png}} |
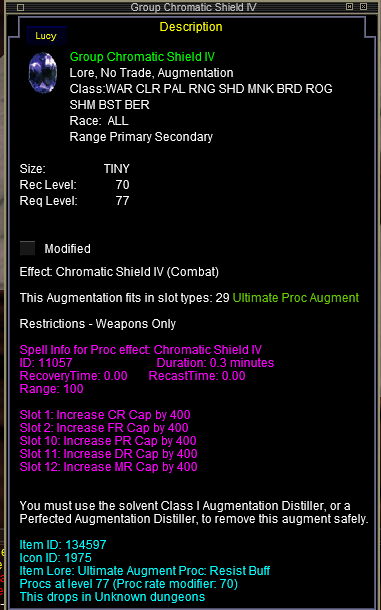
| − | Image: | + | Image:gcs3.png|Group Chromatic Shield IV|link={{filepath:gcs4.png}} |
</gallery> | </gallery> | ||
<br> | <br> | ||
| Line 69: | Line 69: | ||
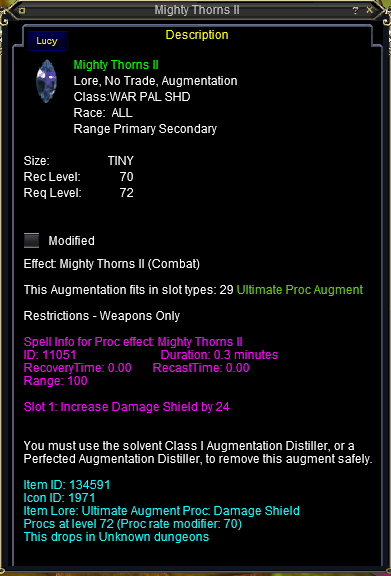
Image:mt2.png|Mighty Thorns II|link={{filepath:mt2.png}} | Image:mt2.png|Mighty Thorns II|link={{filepath:mt2.png}} | ||
Image:mt3.png|Mighty Thorns III|link={{filepath:mt3.png}} | Image:mt3.png|Mighty Thorns III|link={{filepath:mt3.png}} | ||
| − | Image: | + | Image:mt4.png|Mighty Thorns IV|link={{filepath:mt4.png}} |
</gallery> | </gallery> | ||
<br> | <br> | ||
| − | + | ||
| + | |||
Revision as of 09:01, 2 March 2022
Ultimate Augments are purchased from the Hive Queen in Stonehive, using the Hive Shards alternate currency.
Hive Shards are acquired from the Catacombs of Dranik, Bloodmoon Temple, and Old Blackburrow.
Augment Upgrade Tokens
Some Ultimate Augments can be upgraded, combine the augment with the correct upgrade token in a magic box.
Rank I Augment + Augment Upgrade Token = Rank II
Rank II Augment + Augment Upgrade Token II = Rank III
Rank III Augment + Augment Upgrade Token III = Rank IV
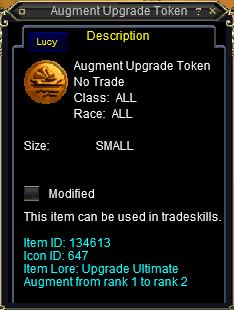
Augment Upgrade Token

Augment Upgrade Token II
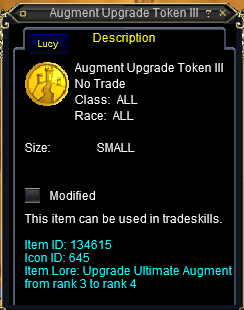
Augment Upgrade Token III


Upgradable Augments
Hatestomp

Hatestomp
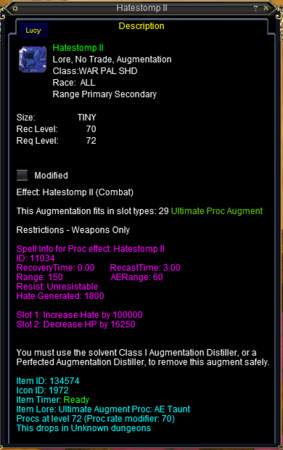
Hatestomp II
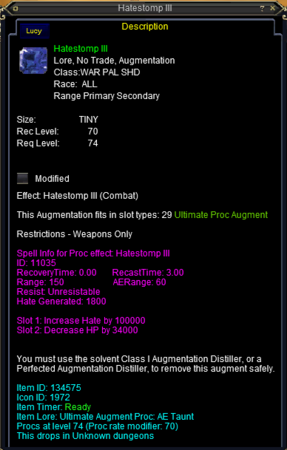
Hatestomp III
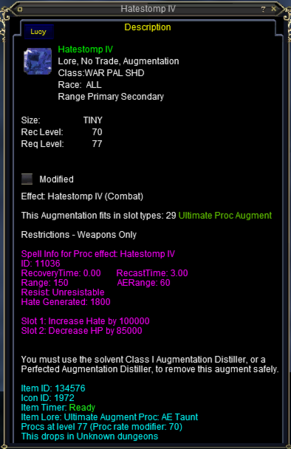
Hatestomp IV


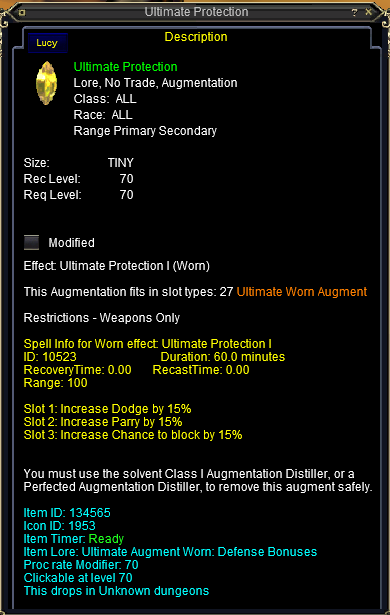
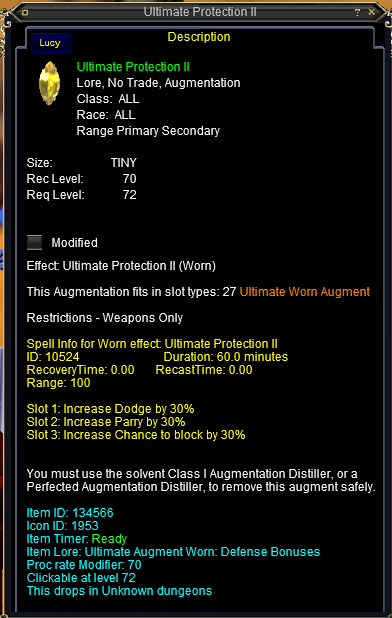
Ultimate Protection

Ultimate Protection

Ultimate Protection II
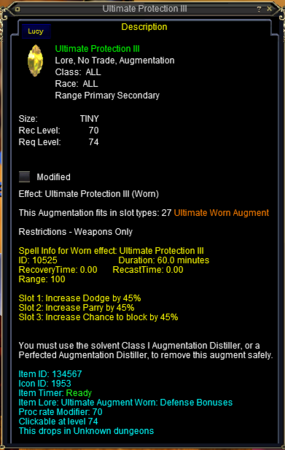
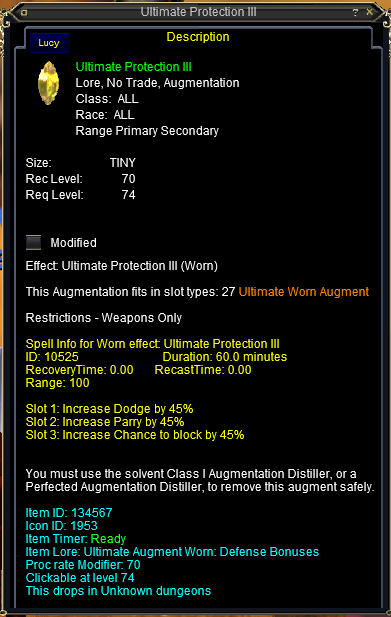
Ultimate Protection III

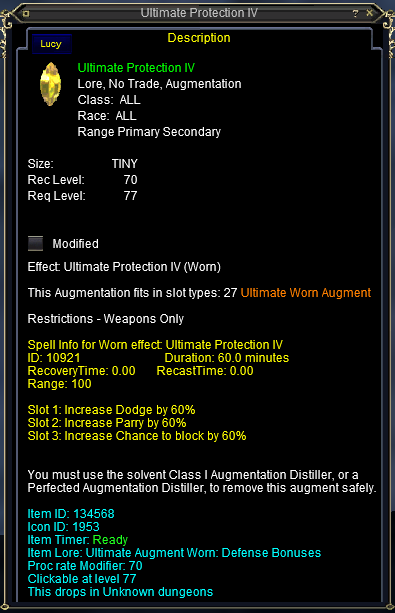
Ultimate Protection IV
Wide Arc Swing
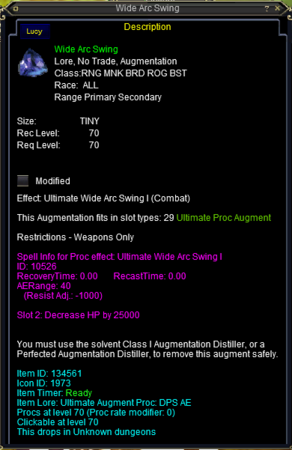
Wide Arc Swing
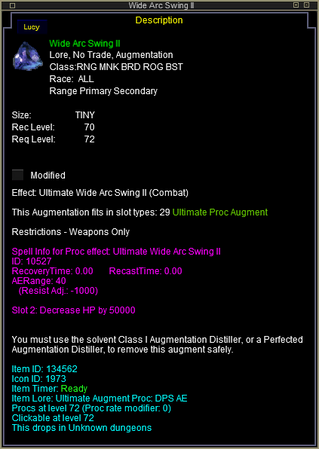
Wide Arc Swing II

Wide Arc Swing III
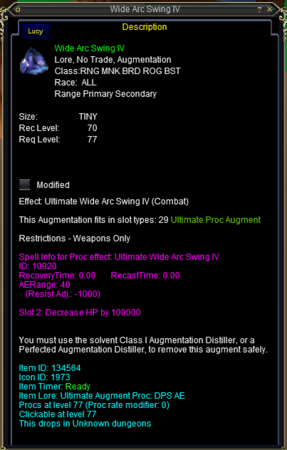
Wide Arc Swing IV


Group Short-Lived Blessing

Group Short-Lived Blessing

Group Short-Lived Blessing II

Group Short-Lived Blessing III
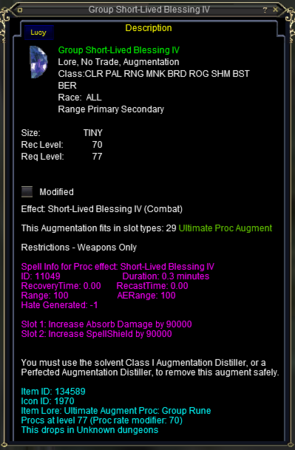
Group Short-Lived Blessing IV

Life From Pain
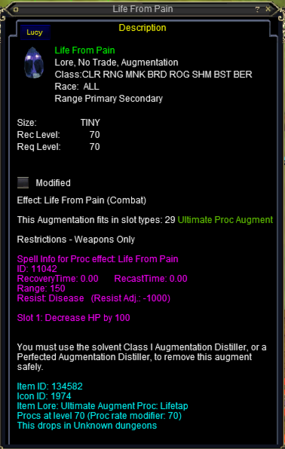
Life From Pain
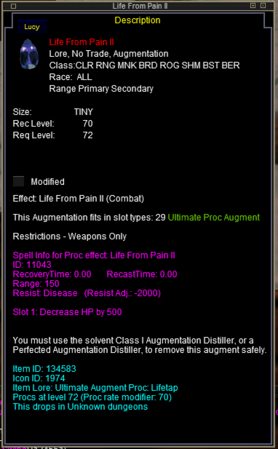
Life From Pain II
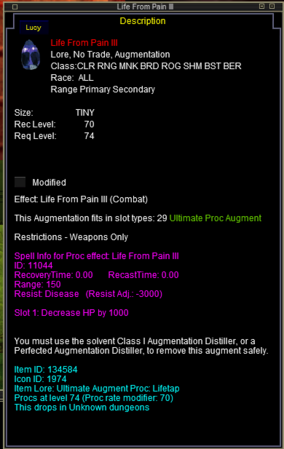
Life From Pain III
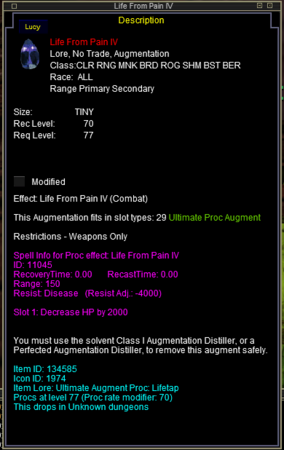
Life From Pain IV


Group Chromatic Shield
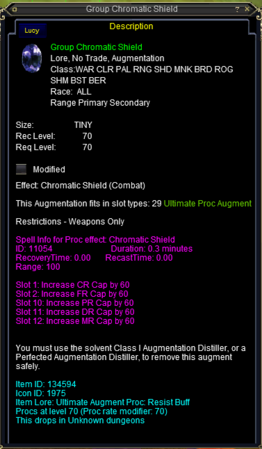
Group Chromatic Shield

Group Chromatic Shield II

Group Chromatic Shield III
Group Chromatic Shield IV
Mighty Thorns
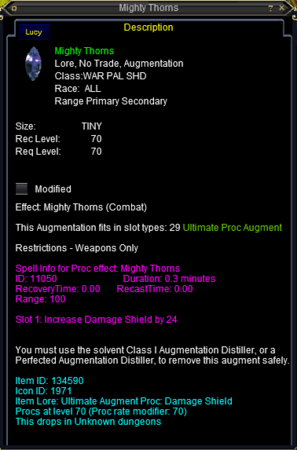
Mighty Thorns
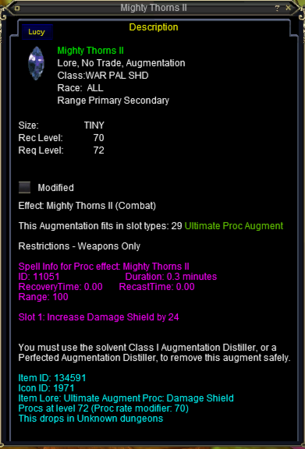
Mighty Thorns II
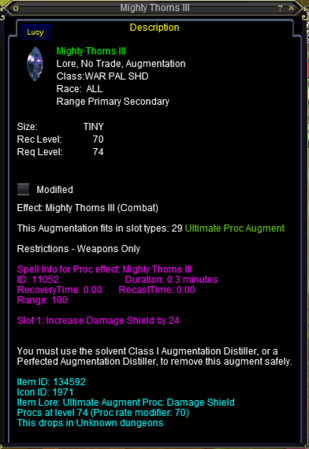
Mighty Thorns III
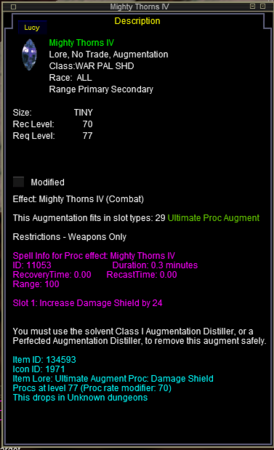
Mighty Thorns IV


Non Upgradable Augments
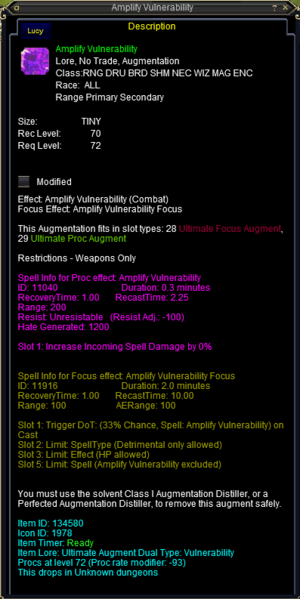
Amplify Vulnerability
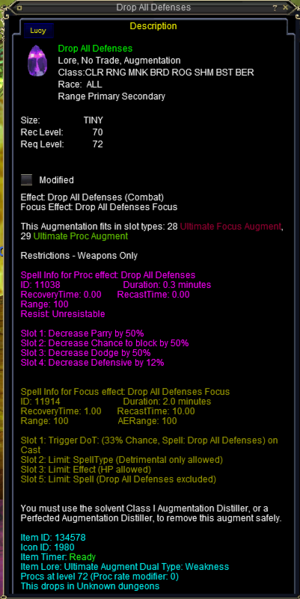
Drop All Defences
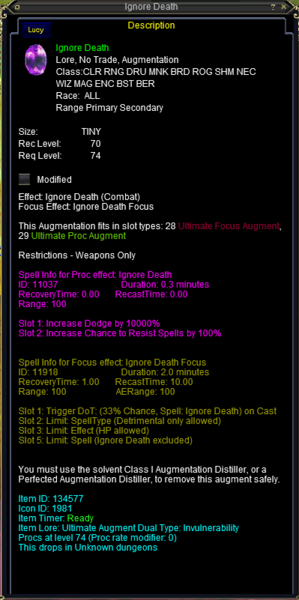
Ignore Death


